Dataentry - Chapter 3 - Products dataentry

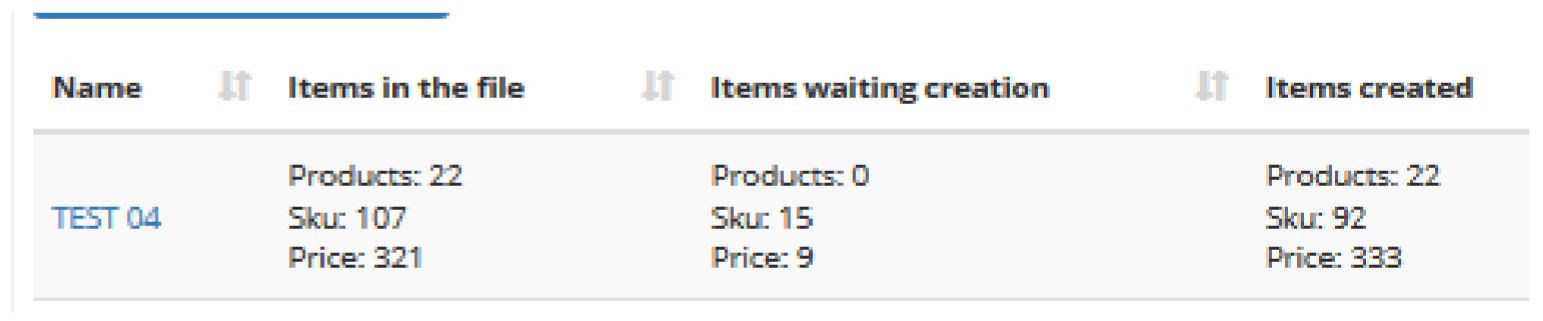
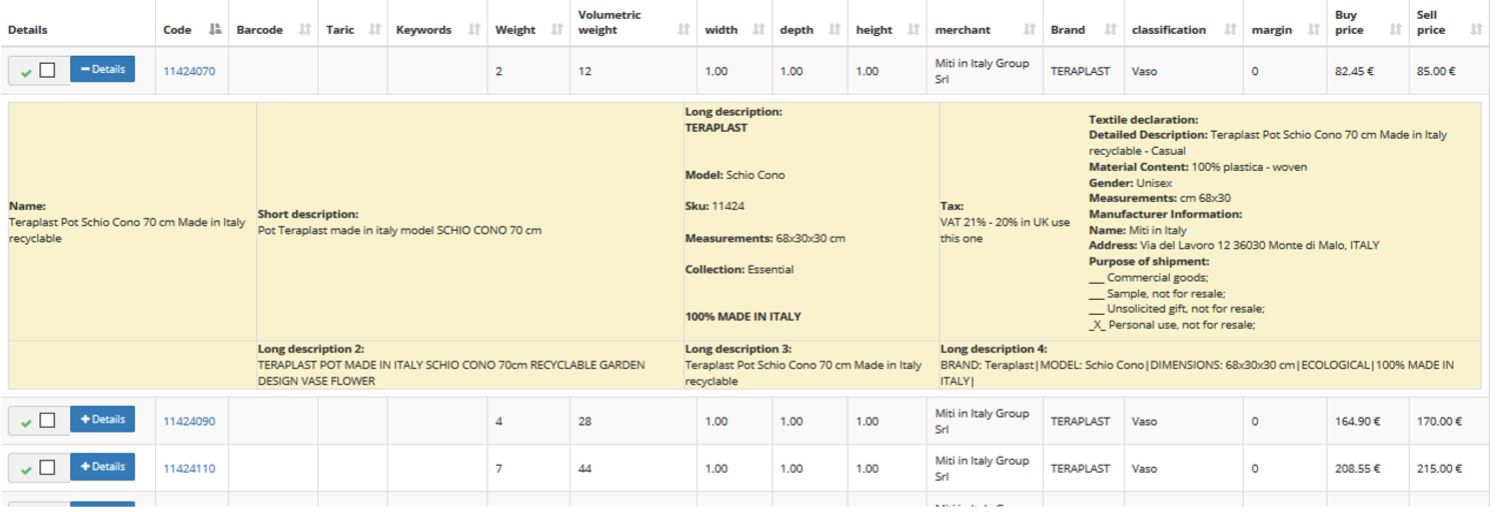
Once you have saved the configuration going through Dataentry section, we have a list of all the Data entry instances and for each of them we can see how many items are provided in the files. We can also see how many have been uploaded in the temporary table, but not in the database (waiting for creation) and how many have also been inserted into the database (created). After we complete a dataentry, we shall have as many items in the file (first column) as those that have been created (third column) and no items waiting for creations (second column).
The option “Check for new dataentry” will check through the FTP folder settled in the dataentry configuration. If there are new csv files to process, it will create a new dataentry row in the list below. The button “List price dataentry” lists all the list price applied through the dataentry import. About a single dataentry you have different actions available:
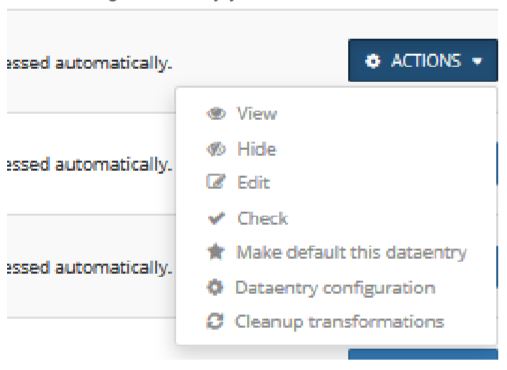
- View: dataentry detailed page.
- Hide: from the products dataentry list is not possible to delete dataentry. If you need to hide useless dataentry, click on Hide and it will disappear from this page and will be listed in the Hidden Data entries page. A hidden dataentry can be deleted (“Delete”) or reactivated (“Make Visible”) by clicking on actions, under the hidden data entries list. Hiding a dataentry would not affect the products online. -
- Edit: allows you to change csv files related to this dataentry.
- Check: overview on all uploaded csv.
- Make this dataentry default.
- Dataentry configuration: for a specific dataentry configuration, we use the generic configuration for all data entries.
- Cleanup transformations: remove all the transformations created by this dataentry
ADD DATAENTRY
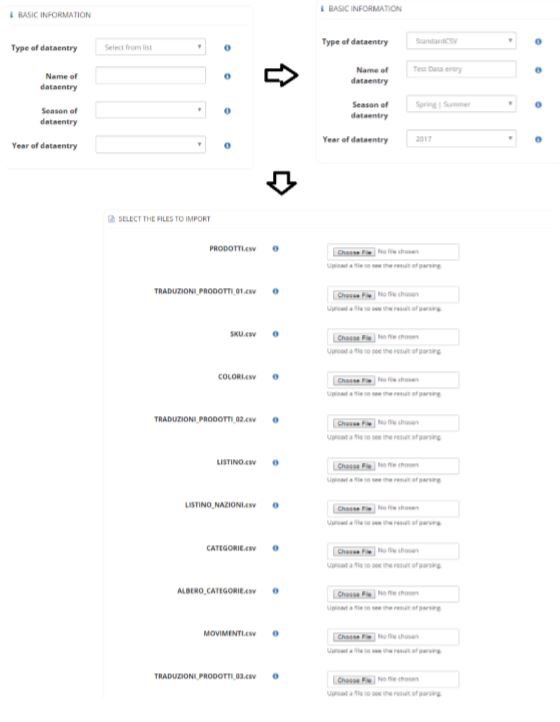
Click on ADD DATAENTRY and in the next mask you have to add the standard information about the type of the data entry. You are able to choose just Standard csv, the name of Data Entry, the collection season and the year. You will then list all of the csv files that you need to upload to the Kooomo platform to create the dataentry. After saving all the files, Save the configuration. It’s now time to create the content.
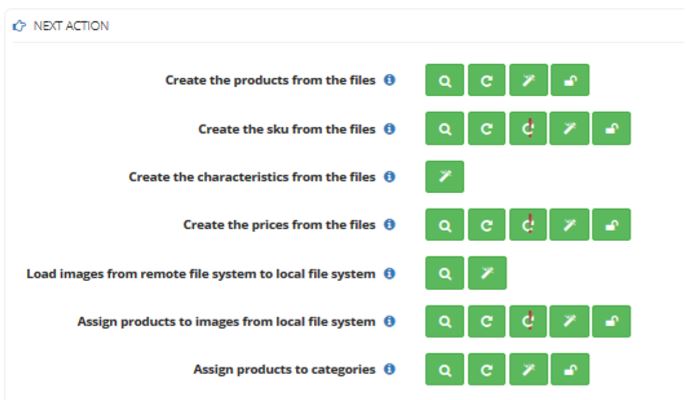
The lens (inspect) allows you to see what is inside the temporary table without affecting the content. The arrow (parse) compares the content of the file with what was already inside the temporary table. If there are some new lines with a product code still not present in the temporary table, it will be copied into the table - otherwise will be ignored. The arrow with the exclamation point compares the already created products with what was already inside the temporary table and add only new lines. The magic wand (flush) creates the content. If the dataentry was already created, it will cancel anything that is inside the temporary table and copies into it, the content of the file.
After we created a new Data Entry and uploaded all the csv files, the only button that we can click is the magic wand on products.
Highlighted rows correspond to records inserted from a previous dataentry. Be careful because you can overwrite products information. The green flag corresponds to a record that has been inserted from this dataentry. If the record is flagged the product is not currently present on the database and should be created by clicking on “Create from selected” at the very bottom of the page. By doing so, we are going to create products in the Database.
You have to consider that if during the first upload the page timed out, the system still continues to create it. You must wait until the system finishes loading and then click on the lens to check products not uploaded in the temporary table. In order to remove duplicated products, you must HIDE the product from the product admin panel, flag all the duplicated products (the one with no DE associated) and click on Hide Selected at the bottom of the page.
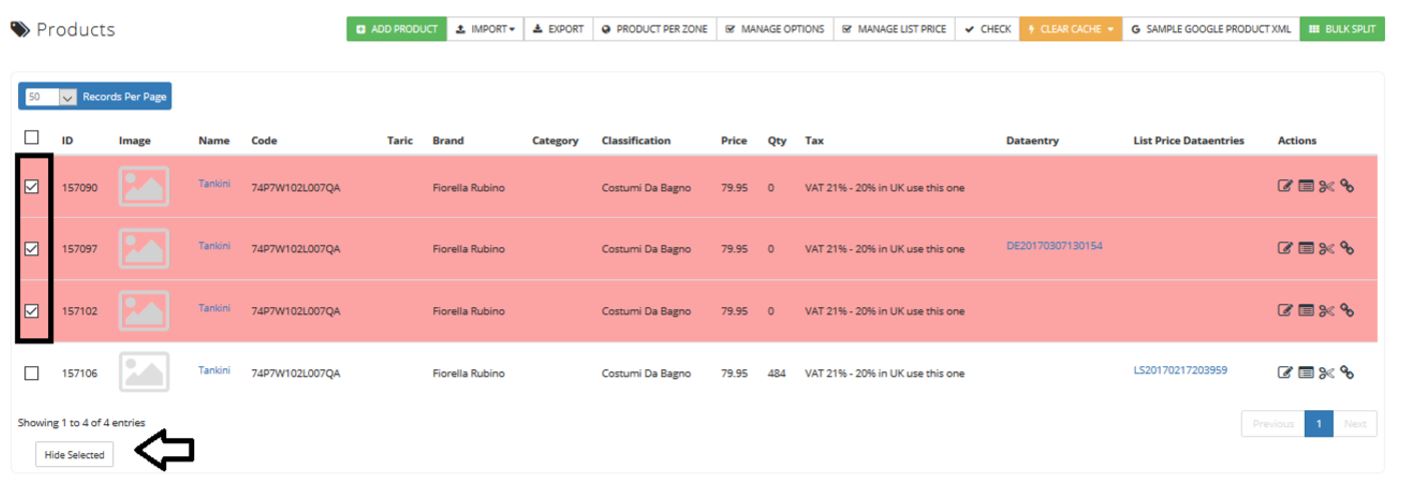
Once you’ve hidden all duplicated products, click on Advanced Search – flag “Search on hidden products”. This page lists all the products hidden from the shop. Flag the ones you want to remove and click on REMOVE button at the bottom of the page.

Once you have uploaded the product.csv you can process the sku.csv file. By doing this, we fill the SKU temporary table with data from the related csv (skus and color.csv). Once the file is processed, several red messages will appear on top of the page. These are errors that need to be managed. Make sure that all the colors and sizes already associated have translations required, and make sure that all colors refer to a main color. Once fixed, click on create by selected and you’ll copy all that information in the database.
By uploading products, we create products (data related to the default product) in our database. By uploading SKUs, we create them associated to the product and option related. By managing red messages for SKUs, we create option required. Data can be uploaded only if we have the related product in the products temporary table of the current dataentry.
Third dataentry step is about to how upload translation_03.csv, products characteristics file. Before uploading the file, we should be sure to have associated characteristic to the brand. The main characteristic should be the same as in the dataentry file. Go to Catalog > Characteristic and by clicking on “Assign characteristic” you can see which ones are assigned to the brand. Once we have added options in the temporary table, we can double check that all of the info is correct.
By inserting translation_03.csv we created the characteristics that were not already present on the database and we associated products to the related one.
Once products are uploaded, SKUs and characteristics of products can be assigned to categories. In order to go live, a product should be assigned to a visible category. So, remember that if a product has quantity and images assigned, adding it to a category it will cause it to go live - so be sure that everything has been correctly inserted. By clicking on magic wand button for “Assign products to categories” you will create both the category tree and assign products inside the category.csv to each category. Any error message here can be related to a category not existing or to a category that has been provided with a category key difference from the one used to create it.
Another important option that a product should have in order to go live is the price. By default, on the product page the default price shown is part of the product information uploaded by product.csv. This means that if there is no price set or defined, or if there is a zone in which the price is not defined, the default price will be showed (N.B Just the value will be showed, the currency will be the one of the country).
On the Kooomo platform, a pricelist is a list of prices that will be used for products in a certain price zone (defined in the zones setting panel). A price zone is defined by a group of countries or a country and a currency (i.e. UK – GBP). Make sure a country doesn’t appear in more than one price zone and remember that once we activate a pricelist it will be valid for the entire eShop. It is not possible to make a pricelist valid for just one category / product / collection.
Which checks the system does in order to check the correct price? • IP address • User address id it’s logged in • Check if it’s included in a price zone and in which one • If it’s in a price zone and we have a price for the product, it shows the price from that pricelist • If it’s in a price zone but we don’t have a price for the product in that pricelist, the system shows the default price - keeping the currency of the pricelist • If it’s not in the price zone, it will just show the default price and the default currency.
Once all those points are cleared, you can create the prices from the files by clicking on the magic wand.
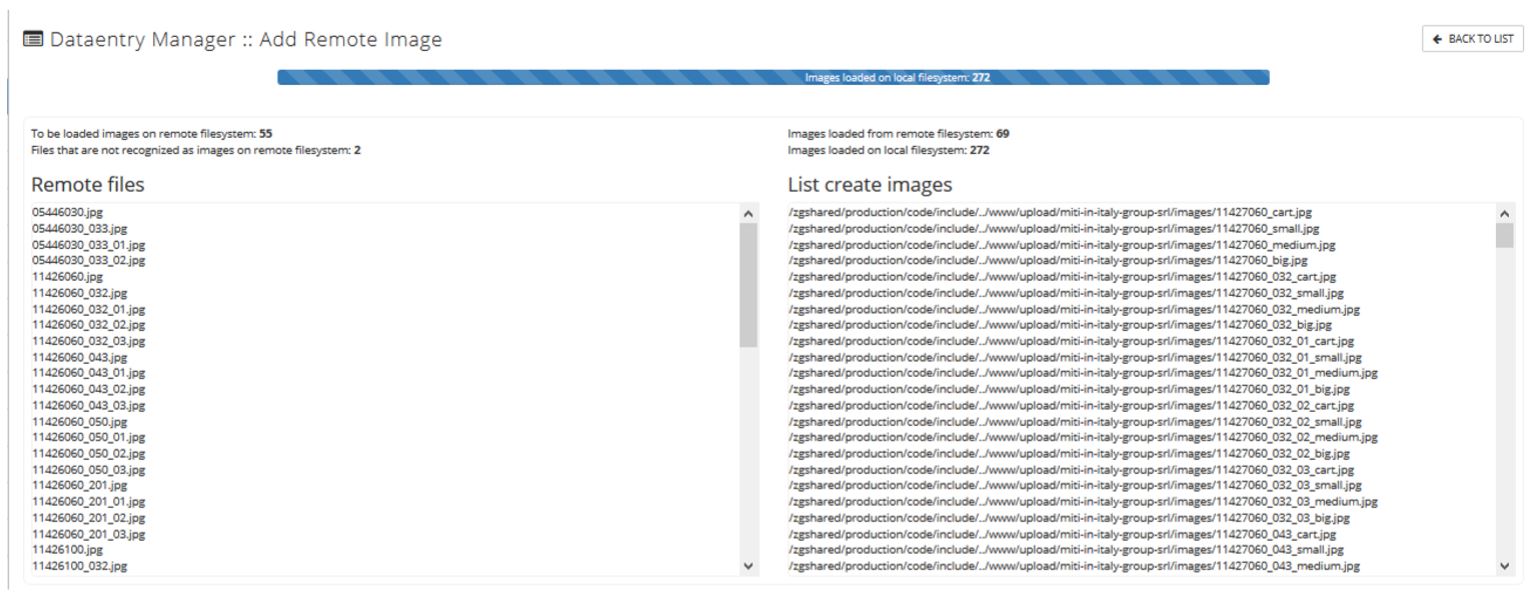
The last dataentry step is related to images. This step is divided into two. First step is loading images from remote file system (FTP) to local file system (temporary table). During this step:
- System recognizes pictures related to the product.
- Resizes images according to images settings.
- Transfers images from FTP to our server.
- Removes images from the FTP.
Under “remote files” there is the list of images on the FTP. On the right side the list of resized pictures on our server. Once system complete to create images, the ones remained on the left column are the images that cannot be uploaded in the temporary table (no related products in this dataentry for example or image not correctly encoded).
The second step is to assign products to images from the local file system. Notice that you could have a lot of errors in the Error tab but they may not be related to real images errors. For example, if an image has just 2 views but system expect to have 5 views (_05) it is marked as error. Is not mandatory to upload all views settled but the system expect to have them.
ERROR MESSAGES
Here below few examples of errors that we could have from the product dataentry:
Product XXXXXXXXXXX – missed depth
Product XXXXXXXXXXX – missed width
Product XXXXXXXXXXX – missed height
Product XXXXXXXXXXX – missed price
Product XXXXXXXXXXX – missed brand
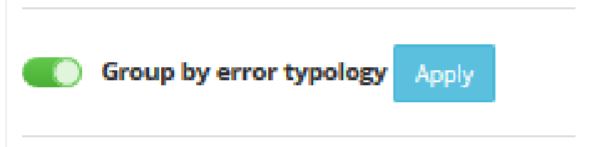
This kind of info lets you know that a data is missing. Verify if there is something wrong or missing inside product.csv or if it has been agreed with the client not to receive this kind of data. Before uploading dataentry, be sure to have created the BRAND to be associated to products. For each error system suggests a solution between “assign an existing value” or “create a new value”. The flag “Group by error typology” will show you the generic error that affect the file. By unflagging it, you will see each single error for each product code repeated
Product XXXXXXXXXXX - product name
Product XXXXXXXXXXX – translation language
Verify if there is something wrong or missing in the file translation_01.csv.
Product XXXXXXXXXXX – missed color name
In the SKU file, we may have a color associated to a product which is not defined in colors.csv.
Color 00 – WHITE not found Transform value – Insert new value
This is the first time this option is provided and needs to be inserted in the database. “Insert new value” will modify the suggested key. “Transform Value” allow you to select the most appropriate option from the list provided. It is advised to click on “Transform value” and check if we already have some “compatible” options in the database. If there is any compatible options, insert new value and Kooomo system will insert the new option.
Characteristic CAMMELLO not found Transform value – Insert new value
The system did not find the characteristic in a characteristic group. You should check if this value is being inserted in the correct characteristic group or if can be associated to an exisiting one. Click on “transform value” otherwise insert a new value.